Please sign in first
Not a member?
- Home
- Online Education Programs
- RG/RGA Legacy Entrance
- ISG Credentials
- Frequently Asked Questions
- Registry of Graduates
- Careers in Gemology
- Important Program Information
- Newsletters
- Identifying Lab Created Diamonds
- Black Diamond or Created Moissanite?
- Ebay, the GIA, and Section 230
- Lessons From the Angry Janitor
- Exposing the Truth about Lab-Created Diamonds
- AGTA Hobbles Dealers and Buyers
- Appraisers -v- Gem Labs…a Legal Imbalance!
- Understanding the Classification of Diamonds
- Cremation Diamonds: Insuring and Litigating
- Let’s Talk About Gemology Credentials
- Hometown Jewelers and the Force Majeure Clause
- Following the Critical Angle of Diamond Grading
- When Breitling Brought the Airmen Home
- Let’s Open a Refractometer
- Measuring the Energy of Light
- Quick Reference Guide to Sunstone
- ISG Seeing the Invisible Light
- Contact Us
Following the Critical Angle of Diamond Grading

Following the Critical Angle of Diamond Grading
Have you ever wondered why one diamond can be very brilliant, while another diamond may look dull and lifeless? Or perhaps you sell diamonds and cannot figure out why the guy down the street can sell the same VS2/G diamond that you have, and yet constantly beat your price by 30%?
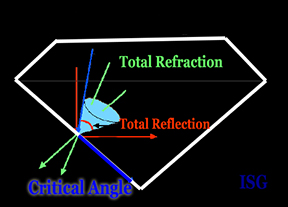
Well, it all boils down to a little cone shaped structure you see in the graphic at left. It is known as the “critical angle” and it is the most important property of a diamond related to beauty. This imaginary cone controls the brilliance, beauty, and value of a diamond more than anything else. Diamontaires have to know and understand the critical angle in order to produce the finest quality.
If you look again at the graphic above, you will see that there are three possible paths that a beam of light can take. Light that travels inside the cone will be totally reflected back into the diamond. Light that travels outside the cone will be refracted out of the stone with the direction of travel changed. Light that enters at just the exact degree to be down the cone will be refracted down the surface of the stone. This concept is also used with the refractometer, but for our purposes today we will stick with the concept of the critical angle.
The importance of the critical angle is that diamond cutters can use their knowledge of this property to control the path of light entering a diamond. The concept is to cut a diamond so that all light that enters the diamond from any direction, will go out the top of the diamond….creating brilliance.
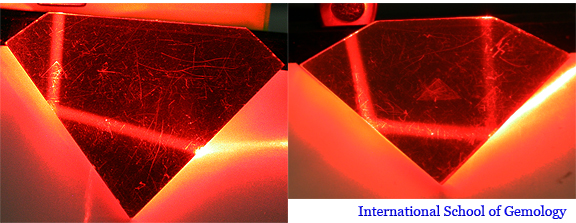
For our demonstration today we have resurrected an old cut grade demonstration tool that we obtained from the GIA Gem Instruments decades ago. It is composed of three plastic gemstone shapes that can be used to demonstrate the concept of the critical angle. This unit was on the front counter when the drunk driver tore through our office a few months ago so we ask your patience with the scratches you will see. However, by altering the demonstration a bit and using a laser beam, we believe that the demonstrations below will provide a better understanding of the importance of the critical angle, in spite of the scratches left by the crash. Let us take a look….
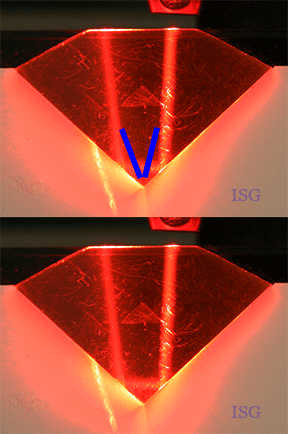
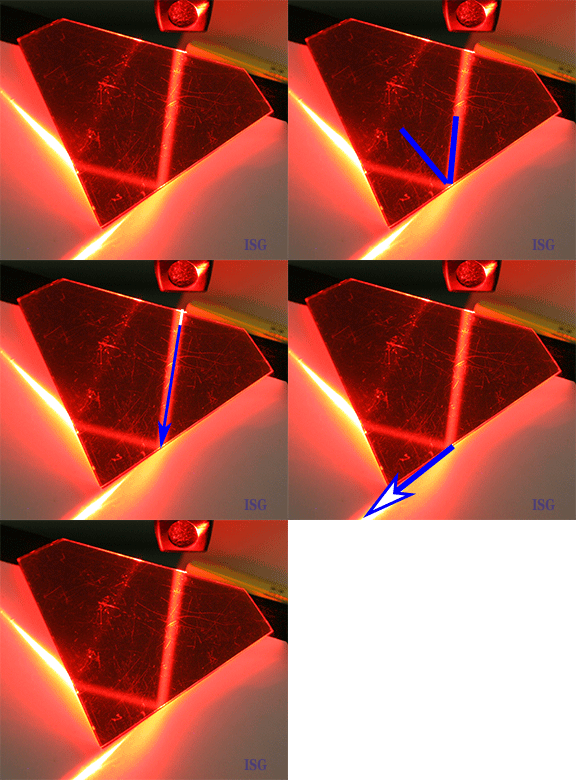 At the left we will deal with only one path of light. If you follow the arrows you can trace what is basically the critical angle of this demonstration piece. Although a second light beam is being reflected back into the stone (we will call it a “stone” for simplicity’s sake), we will only deal with the light beam that is taking the basic path of the critical angle here to better show the concept of where the critical angle exists in this picture. The blue cone shape is the critical angle, the arrows follow the light beam path of the critical angle.
 Here is a demonstration of total light refraction. If you note the beam of light is traveling straight down into the stone and hits the bottom at an angle that is within our cone representing the critical angle.
When this happens, the light is refracted or bent and sent outside our stone. This is what happens when a diamond looks dull and lifeless, the light is being “leaked” out the bottom of the stone, a term appropriately called “light leakage” in the industry.
 If we move the laser beam slightly to a point that the beam hits the bottom of the stone outside the critical angle, we get total internal reflection as the light is reflected back into the stone.
This is an example of controlling the path of light to create the most brilliant diamond possible. Not that although the light is going into the diamond from the top or table, its path has been controlled to direct it back out through the table. This creates a brilliant diamond.
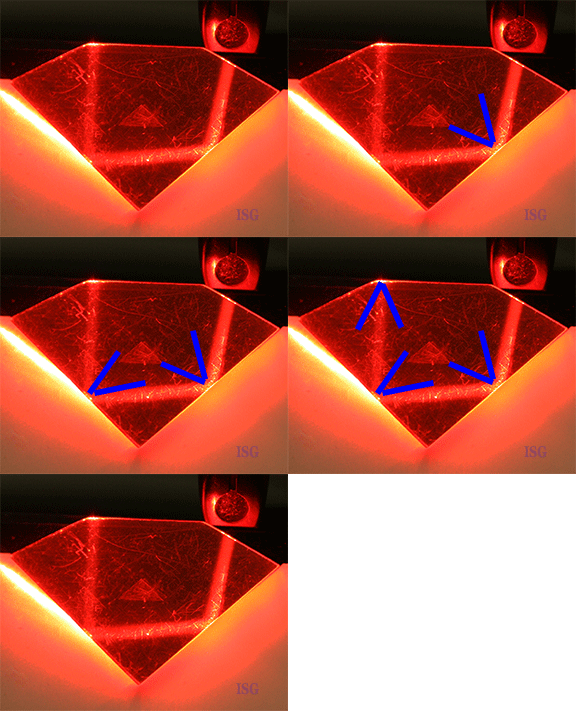 A properly cut diamond, sometimes referred to as an “Ideal Cut,” a term pioneered by the American Gem Society, will be the most brilliant as all of the light entering the stone will be controlled to go out the top. If you compare this image to the one above you will see that light is entering through two totally different directions, but its path is still controlled so that it exits the stone out the table.
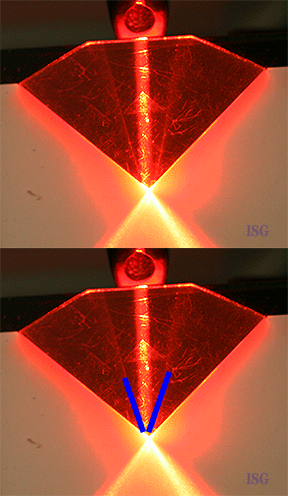
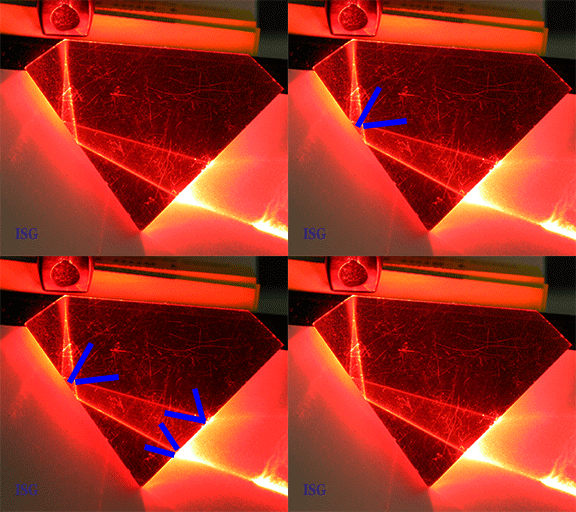 Now, what about those dull and lifeless diamonds? The demonstration at left will explain this better than words. When a diamond is cut too deep, as shown here, the light path is such that the light is first reflected totally back into the stone, but the second contact point is within the critical angle cones and the light is leaked out the bottom of the stone. This significantly cuts down on the brilliance of the diamond, while at the same time causing the diamond to be much heavier than required.
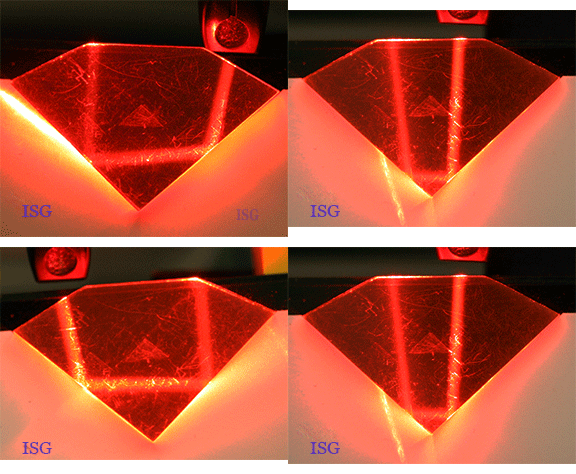 Finally, we have the perfectly cut diamond where light going in from any location will be controlled by the critical angles to exit out the top of the stone, thereby creating maximum brilliance and maximum beauty.
Now, what about that diamond customer who claims the jeweler down the street has the same 1.00ct, VS2/G diamond you are offering but 30% lower in price? Show them the image below and explain that the real beauty of a diamond is based on its brilliance, and that brilliance is controlled by the critical angle and how well the cutter utilized it. Show them the picture panel below and let them know that your diamond is on the right, and the competitor’s diamond is on the left. Which do they want to wear to the party?
 The importance of the critical angle relating to diamond quality and beauty was pioneered and first taught by the American Gem Society. I was fortunate enough to be trained as an AGS Certified Gemologist in an AGS member store years ago. Unfortunately, AGS training is not available to most of the industry due to their highly restrictive membership requirements. So, for the rest of you out there, we welcome you to join us to gain this knowledge at a fraction of the cost, and where everyone in the world is welcome to study this amazing property of diamond beauty.
